#Goal
1. Create custom keyboard using iOS 8 App extension, use xib to render keyboard view.
2. Show two buttons "¯\_(ツ)_/¯" & "(⌐■_■)" over it, clicking on them will add respective text on textviews.
#Source
Link : KeyboardExtension
#Steps
STEP 1:
Create single view application using objective-c.
STEP 2:
Add new scheme : Application Extension > Custom Keyboard


STEP 3:
Name the keyboard extension as "ADKeyboard", and click finish.

Just cancel activate "ADKeyboard" scheme, as we are not going to build this scheme right now.

STEP 5:
You will see new three new files added for extension view controller .h, .m and .plist for configuration. KeyboardViewController is default name used for keyboard view's controller file.

STEP 6:
Check .plist it contains many important configuration settings, including setting view controller file name for keyboard view ( by default it is "KeyboardViewController" ).

STEP 7:
Go to Main.storyboard, there should be only single view as app was created single view app, add textView to this view, set 0 margins on all four side just to use keyboard inside application.
STEP 8:
Set some background colour to recognise added text view.
STEP 9:
Run the application, wait for minute. ( When you run for first time, iOS shows this new keyboard option in settings. It is observed that sometimes adding option to settings takes time. )
NOTE : While running on simulator make sure you are using simulator keyboard and not your hardware keyboard ( XCode 6 comes with default option hardware keyboard enabled, so you will not see simulator keyboard when typing ).
To enable simulator keyboard, Select simulator, Go To Hardware > Keyboard > Uncheck "Connect Hardware Keyboard".
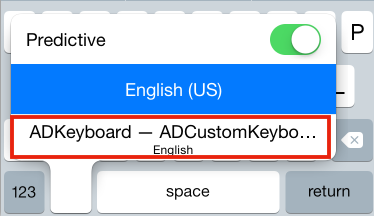
STEP 10:
Now to go iOS Settings > General > Keyboard > Keyboards > Add New Keyboard


Once selected, you will see keyboard listed under enabled keyboard list.

STEP 11:
Go to running application try to type something in TextView. This will show default top priority keyboard.
STEP 12:
Now long press on Globe key on keyboard ( In some cases you will see smiley key instead of globe. Just click smiley key and then you will see Globe key ).

Select your custom keyboard.
This is how default custom keyboard looks like, just one button provided to move to next keyboard.

STEP 15:
Now go to "KeyboardViewController", this is view controller for keyboard view and this is where we are going to code. Remove all code related to "nextKeyboardButton" i.e
a. Variable declaration
b. all code in viewDidLoad
c. title color code from textDidChange
STEP 16:
Lets start customising keyboard by using .xib
Add new .xib named "KeyboardView" under same directory where "KeyboardViewController" exists.
STEP 17:
Now changed its size to 320 x 216.
STEP 18:
Change its background colour to dark grey to recognise view.
STEP 19:
Set .xib's custom class as "KeyboardViewController".
STEP 20:
Now go to "KeyboardViewController" and add these 3 lines in viewDidLoad after [super viewDidLoad].
UINib *viewFile = [UINib nibWithNibName:@"KeyboardView" bundle:nil];//xib instance
NSArray *arrViews = [viewFile instantiateWithOwner:self options:nil];//array of view
self.view = [arrViews objectAtIndex:0];//Top view
This will set .xib as its view.
STEP 21:
Run application, app should look similar to this with text view and keyboard background having respective background colour set.

STEP 22:
Now go to keyboard .xib file, add two buttons at centre with title as " ¯\_(ツ)_/¯" & "(⌐■_■)".
As we have already set view controller for this xib as "KeyboardViewController" we can directly connect IBAction for buttons in viewController file. Set same IBAction method for both buttons.
Now update IBAction method code for buttons as below
- (IBAction)keyboardKeyPressed:(id)sender
{
UIButton *btn = (UIButton*)sender;
[self.textDocumentProxy insertText:btn.titleLabel.text];
}
This will take title text of buttons and will add to textDocumentProxy which will show text on TextView.
STEP 23:
Run the application, click buttons over keyboard, respective texts will get added in textView

No comments:
Post a Comment