Tuesday, February 24, 2015

Solution for OS X installation error : OS X Installer reporting "This disk cannot be used to start up your computer"


Possible reasons could be.


1. Drives that either have been restored from Time Machine backups or have previously been used for Time Machine backups.
2. Installed Linux, windows or other operating systems, so the drives may contain a number of hidden and custom partition setups that could interfere with the OS X installer. This may be as simple as not having an EFI partition on the drive (a hidden 200MB partition that contains boot information and options allowing the drive to be recognized by and interact with the system's EFI firmware).

To see details of your disk, open the Terminal and type "diskutil list" followed by pressing Enter. 

This should output the drives by device ID and show the various partitions on them. In some cases partition entry that is named EFI will be missing this could be the reason for installation problem.


Above are top two reasons, there could be other reasons for this but try this solution it works in most of the cases, first part of solution is provided by apple.


Solution


Solution which i have tried and worked on many machines while installing OS X 10.9.x, 10.10.x 

1. Restart your Mac from your usual startup disk.
2. Open Disk Utility, located in /Applications/Utilities/ .
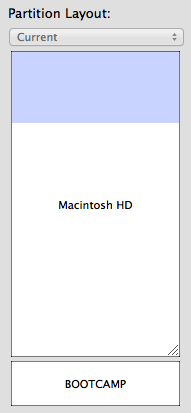
3. Select the disk where the volume you intend to upgrade resides. This usually starts with a number representing the total size of the disk.


.


4. Click the Partition tab


5. Click and drag the resize corner of your intended install partition to make the size slightly smaller. The blue portion represents used data space. The partition only needs to be approximately 128MB smaller than it was before resizing but it needs to be larger than the blue portion.

Before :

 After :


6. Click Apply.

Note : For some cases just performing above 5 steps should work, If not you will also need to perform steps below.

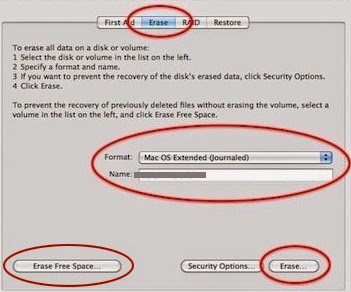
7. Create new partition of empty disk space left after resizing. Click + at bottom to create new partition of Format : Mac OS Extended ( Journaled ) and click apply. Wait for new partition to create.


8. Now select newly created partition from left side and go to erase tab and "Erase Free Space" 
Note : don't use normal erase option at right. Wait till new partition get erased completely.


Done with all the steps ? now you are ready to install OS X.

Quit Disk Utility & Quit OS X installer if already active, wait for minute and install OS X.

After the OS X installation is complete, you can use Disk Utility to resize the partition back to its original size by deleting newly created partition & dragging the resize corner to make the partition as large as it was before.


Sunday, February 1, 2015

Testflight Beta Testing inside iTunes Connect


Following is step by step guide to use iTunesConnect for build pre-release / beta testing process.


1. Enabling prerelease testing

To start with this make sure you have your app created through itunes Connect account, if you don't have, create one. Once you are done with creating, do this


Go to iTunes connect > My App > Prerelease Tab
Under Prerelease tab there are three tabs Builds, Internal testers & External testers. Select Builds tab.
This will list down all application available, select your app, on right side there is a switch with title “TestFlight Beta Testing”, turn it on.


Note : If no builds are uploaded previously you won't see any switch to turn on beta testing. To upload build follow steps from 2.

2. Creating ipa

Requirement : App Store Distribution profile containing the beta entitlement to distribute builds via TestFlight.

If you are using profile generated after September 2014 it already contains beta entitlement required to enable beta testing feature. Just open Profile in Text Edit and see if there if flag with name beta-reports-active with value true. 


If you are using older profile, regenerate it, regenerated profile will by default include this flag with value true.


NOTE : Using improper profile will result in status stuck at "Processing" under prerelease tab of itunes connect ( after uploading your app to iTunes Connect for beta testing ).


Nothing other special needed while creating .ipa, use standard archive process with proper certificate & profile. Use different build or version number for every .ipa, you can't upload .ipa with same version & build number.


3. Uploading

Requirement : Need iTunes connect account credential for upload. ( Account type Technical / Admin will work ) 

Software for uploading :  
    Xcode - Use submit option from organizer  (  Only applicable if application build from that Xcode ).
    Application Loader - For ipa saved using xcode export option  ( This is tool by apple for uploading )


4. Where to see list of builds / manage tester

Go to iTunes connect > My App > Prerelease Tab > Select your app ( This is equivalent to Testflght site )


5. Manage testers


    Internal testers ( part of your itunes connect program ) 

    ( 25 tester allowed, each can install on upto 10 devices )

  • To be eligible to become an internal tester, a user must be part of your iTunes Connect team with the Admin, Legal, or Technical role. So add people to your itunes connect team to whom you want to make internal tester.

      Inviting internal tester :
  • Go to iTunes connect > My App > Prerelease Tab > Select your app
  • In “Internal Testers” tab there is option “Invite Testers”, this will list down all members of iTunes Connect team, check those whom you want to invite.


    External testers ( not part of itunes connect program ) 

    ( This option is not suitable most of the times, as app goes through review process which is time consuming )

  • No need to add these tester on iTunes Connect team, just need their email id to invite them.
  • App need to go through Beta review process of apple which is similar to regular app review process.

      Inviting external tester :
  • Go to iTunes connect > My App > Prerelease Tab > Select your app > Select external tab
  • Add email ids of people to whom you want to invite as external testers
  • You can also export testflight teammates as external tester, to do this follow these steps
     Exporting :
  1. On testflight site Navigate to the "People" tab
  2. Check mark the teammates you would like to export
  3. Open the "Actions" menu on the right side of the teammates list
  4. Select "Export Contact Info" to download the exported CSV file
     Importing:
  1. Go to iTunes connect > My App > Prerelease Tab > Select your app > Select External Testers tab
  2. Click the plus sign to add new external testers
  3. Use the "Import File" from the "Add New External Testers" page to upload the exported CSV file

6. Installing apps on devices

Testers will receive mail with link, which will redirect to test flight app for installing application.